| Author |
|
Coastie
Newbie

Joined: Aug 29 2008
Online Status: Offline
Posts: 38
Member's Gallery:
View Gallery
Location:
U.S. - New Jersey
|
| Posted: Sep 22 2008 at 11:36am | IP Logged
|

|
|
Here it is step by step (from my 07 KC SE) (Will update with filter pics in the near future)
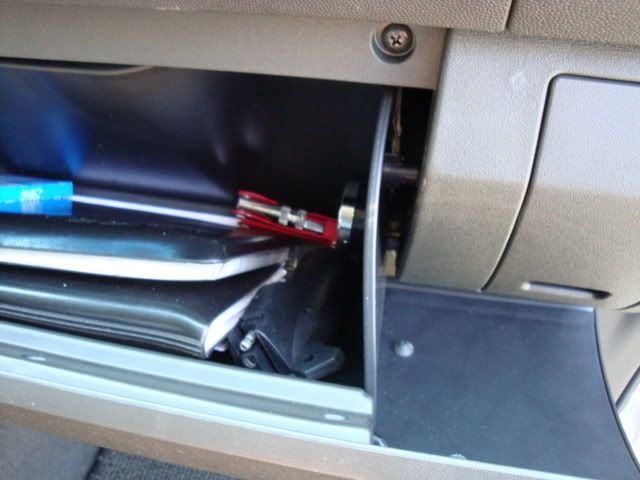
1) Empty and open your lower glove box.
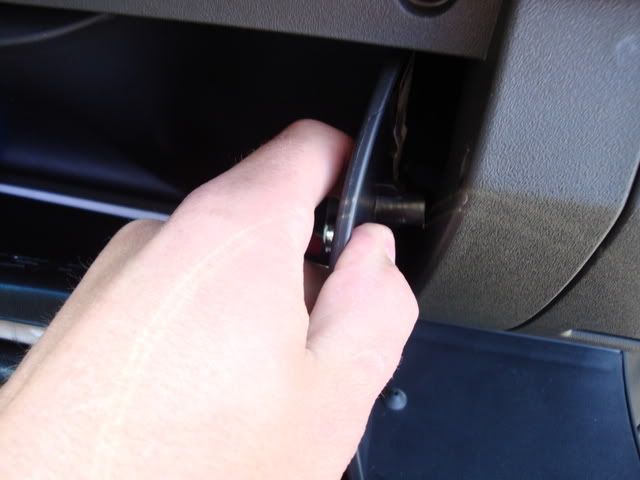
2) Squeeze the sides in so that you can open the door further down, like it's going to fall out.
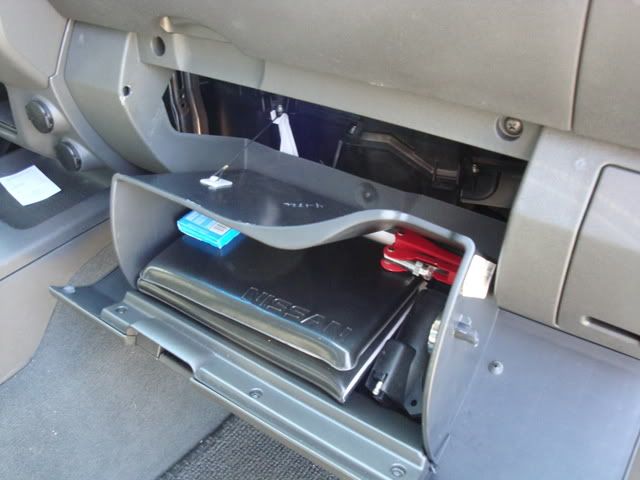
3) Detach the cord, the clasp on it will stop it from going in.
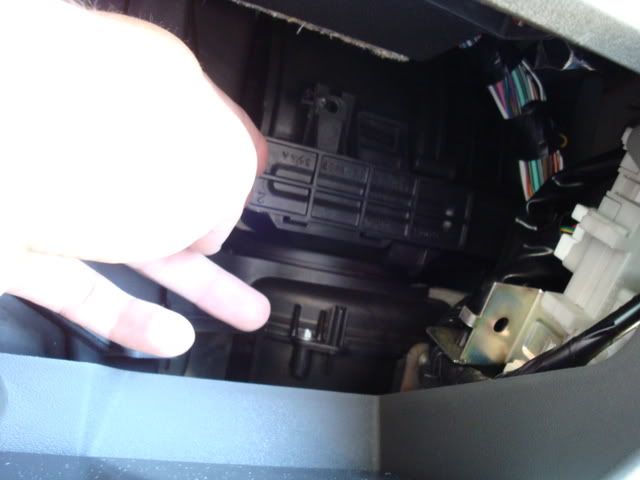
4) Look up and right, there's the cover to the air filters.
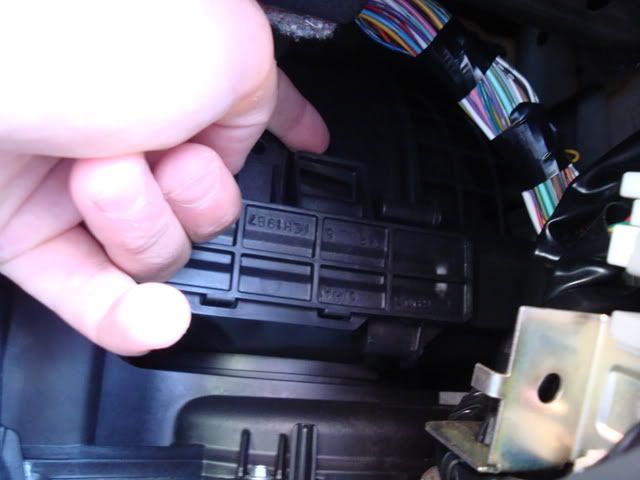
5) Carefully open the lid, don't break the tab.
Pic coming soon.
6) Slide the first one out,
then put your finger into the right and slide
this filter left to
remove it. Place new filter in with the arrows down. You have to put one in and slide it to the right then squeeze the other in.
Pic coming soon.
7) Put the cover back on. I broke my tab so I have to use a zip-tie to keep it on.
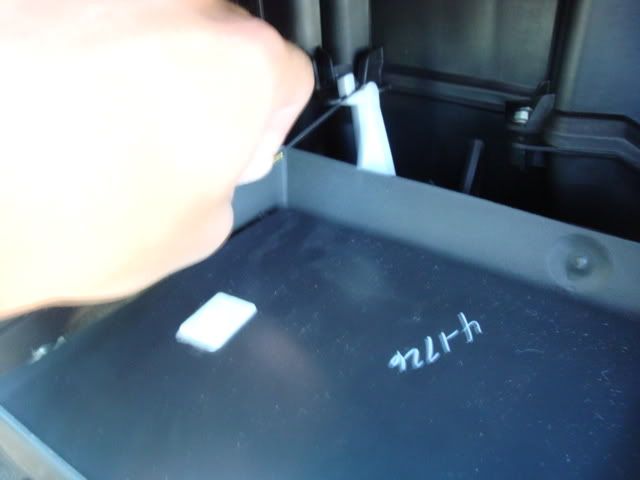
8) Pull string back up over the white post and attach to the door.
pic coming soon
9) Squeeze the door sides in and push back into place.
This takes me about 2 minutes now that I know what's going on and requires no tools.
__________________
2007 KC SE w/6spd 4x4
|
| Back to Top |


|
| |
allenh
Groupie

Joined: Dec 10 2006
Online Status: Offline
Posts: 44
Member's Gallery:
View Gallery
|
| Posted: Oct 31 2008 at 12:53pm | IP Logged
|

|
|
THANKS! Appreciate the post...do you replace every 15k as suggested?
|
| Back to Top |


|
| |
alex973
Groupie


Joined: Jan 20 2007
Online Status: Offline
Posts: 61
Member's Gallery:
View Gallery
Location:
U.S. - New Jersey
|
| Posted: Nov 28 2008 at 10:42am | IP Logged
|

|
|
thanks i was going to ask how to do that.
__________________
alex06NISMO
|
| Back to Top |


|
| |
Lemoninspector
Newbie

Joined: Aug 10 2007
Online Status: Offline
Posts: 23
Member's Gallery:
View Gallery
Location:
U.S. - Texas
|
| Posted: Jan 04 2009 at 11:28am | IP Logged
|

|
|
The shop manual says arrows up. Mine came out with arrows up. So I went back arrows up but you say arrows down. Please advise.
__________________
ASE Certified Master Technician
2007 Crew Cab 4.0L Auto. White.
|
| Back to Top |


|
| |
frontierguy
Senior Member

Master Mechanic
Joined: May 20 2008
Online Status: Offline
Posts: 2591
Member's Gallery:
View Gallery
Location:
U.S. - Pennsylvania
|
| Posted: Feb 04 2009 at 9:09pm | IP Logged
|

|
|
Insert the first new in-cabin microfilter into the front heater and
cooling unit housing and slide it over to the right. Insert the second
new in-cabin microfilter into the front heater and cooling unit
housing. NOTE: The in-cabin microfilters are marked with air
flow arrows. The end of the microfilter with the arrow should face the
rear of the vehicle. The arrows should point downward. This is from Motor All Data.
__________________
'10 Altima SL
Traded 08 Frontier for 16 Frontier SV CC Long box, quite an upgrade. I do miss the 6 speed and Dynomax ex.
Nissan Technician 25 + years
2011 John Deere X720SE
|
| Back to Top |


|
| |
frontierguy
Senior Member

Master Mechanic
Joined: May 20 2008
Online Status: Offline
Posts: 2591
Member's Gallery:
View Gallery
Location:
U.S. - Pennsylvania
|
| Posted: Feb 05 2009 at 8:13pm | IP Logged
|

|
|
Insert the first new in-cabin microfilter into the front heater and
cooling unit housing and slide it over to the right. Insert the second
new in-cabin microfilter into the front heater and cooling unit
housing.
NOTE:
The in-cabin microfilters are marked with air flow arrows. The
end of the microfilter with the arrow should face the rear of the
vehicle. The arrows should point downward.
Just copied and pasted this from the Nissan manual. Arrow pointing down also!!!
__________________
'10 Altima SL
Traded 08 Frontier for 16 Frontier SV CC Long box, quite an upgrade. I do miss the 6 speed and Dynomax ex.
Nissan Technician 25 + years
2011 John Deere X720SE
|
| Back to Top |


|
| |
'07NISMO
Newbie


Joined: Apr 20 2008
Online Status: Offline
Posts: 11
Member's Gallery:
View Gallery
Location:
U.S. - Illinois
|
| Posted: Feb 07 2009 at 11:51am | IP Logged
|

|
|
Thanks for this post. Just changed it out myself, and I wanted to share my thoughts.
- First, you will break the tab. I don't see how you can't. It hard inflexible plastic. There's an additional tab that looks as if it were designed to take a nut/bolt to the left. Use a twist tie around that as suggested. Don't worry we're only in there once a year.
- Mine also came out with the arrows pointing up, and that's how I installed the replacement.
__________________
T-Bone
'07 Storm Grey NISMO 4x4 CC
former owner:
'01 White SE 4x2 CC
|
| Back to Top |


|
| |
mesillynotyou
Newbie

Joined: Aug 16 2007
Online Status: Offline
Posts: 14
Member's Gallery:
View Gallery
Location:
U.S. - Tennessee
|
| Posted: Apr 27 2009 at 12:49am | IP Logged
|

|
|
This is straight from The Nissan Service Manual
IN-CABIN MICROFILTER
Revision: November 2005 2005 Frontier
IN-CABIN MICROFILTER PFP:27277
Removal and Installation EJS003OV
FUNCTION
The air inside the passenger compartment is filtered by the in-cabin
microfilters when the heater or A/C controls are set on either the
recirculation or fresh mode. The two in-cabin microfilters are located
in the heater and cooling unit assembly.
REPLACEMENT TIMING
Replacement of the two in-cabin microfilters is recommended on a regular interval depending on the driving
conditions. Refer to MA-7, "PERIODIC MAINTENANCE" . It may also be necessary to replace the two in-cabin
microfilters as part of a component replacement if the in-cabin microfilters are damaged.
REPLACEMENT PROCEDURE
1. Open the lower glove box and press in on the sides so that it will
open completely allowing it to hang by the cord.
2. Remove the screw and remove the in-cabin microfilter cover.
3. Remove the in-cabin microfilters from the heater and cooling
unit housing.
4. Insert the first new in-cabin microfilter into the heater and cooling
unit housing and slide it over to the right. Insert the second
new in-cabin microfilter into the heater and cooling unit housing.
NOTE:
The in-cabin microfilters are marked with air flow arrows. The
end of the microfilter with the arrow should face the rear of the
vehicle. The arrows should point downward.
5. Install the in-cabin microfilter cover.
6. Close the lower glove box completely.
|
| Back to Top |


|
| |
jbradford
Newbie


Joined: Jul 22 2009
Online Status: Offline
Posts: 9
Member's Gallery:
View Gallery
Location:
United States
|
| Posted: Jul 24 2009 at 9:58am | IP Logged
|

|
|
My truck didnt come with filters and i had to cut out the plastic where they were supposed to go, but it was visably marked where you had to cut and the rest is the same.
|
| Back to Top |


|
| |
milanoguy
Newbie

Joined: Dec 29 2009
Online Status: Offline
Posts: 5
Member's Gallery:
View Gallery
Location:
United States
|
| Posted: Jan 18 2010 at 4:33pm | IP Logged
|

|
|
I have a 2002 Frontier XE, 2WD 2.4L. It appears that it doesn't have cabin air filters - can see where they might go but don't want to start cutting before I'm sure. Any guidance - mine looks nothing like what sin pics in this thread - rather it appears filter go in vertically as suggested in 2002 manual. Thanks for any help.
|
| Back to Top |


|
| |

 Active Topics
  Memberlist
  Search
  Photo Gallery
 Topic: In Cabin Air Filter Step by Step


